- Home
- Blog
- Salesforce
- Salesforce Apex Development Tutorial

- Apex Class in Salesforce
- Approval Process In Salesforce
- Step By Step Guide to Becoming a Certified Salesforce Developer
- Bulkification in Salesforce
- Code Coverage In Salesforce
- Context Variables In Salesforce
- Controller Extension in Salesforce
- Controlling the program flow in Salesforce
- How To Create Data Modeling In Salesforce?
- Custom Controller in Salesforce
- Custom Reports In Salesforce
- DML Operations In Salesforce
- Top 10 Features of Salesforce Lightning
- Governor Limits in Salesforce
- How Salesforce Certification Can Boost Your Career?
- Salesforce Lookup Relationship
- Master-detail Relationship in Salesforce
- User Management And Object Level Security In Salesforce
- Price Book in Salesforce CPQ
- Product Bundle in Salesforce CPQ
- Quote Line Editor In Salesforce CPQ
- Why Learn Salesforce?
- Record Level Security In Salesforce
- Report Building in Salesforce
- Salesforce Automation Testing With Selenium
- Salesforce Collection of Map
- Salesforce Collection of Set
- Salesforce CPQ Implementation Guide
- Salesforce CPQ Tutorial
- How to create dashboard in Salesforce
- Salesforce Developer Certification, Jobs And Salary Trends
- An Overview of Salesforce Development Environment
- Salesforce Interview Questions
- Salesforce Lightning Interview Questions
- Salesforce Lightning Tutorial
- Salesforce Enhances Its Marketing Cloud With AI And Google Partnership
- Salesforce Job Roles And Certifications
- Salesforce Tutorial
- Salesforce vs ServiceNow
- Salesforce Vs Siebel CRM'S
- Access Specifiers in SalesForce Cloud Computing - Salesforce
- An Introduction to Exception Handling – SalesForce
- An Introduction to Visualforce – SalesForce
- An Overview of Salesforce Security
- Annotation in SalesForce
- Classes, Inheritance and Overriding in SalesForce
- Configuring Salesforce Web-To-Lead Form
- Creating Visualforce Page using AJAX Programming - Salesforce
- How to Create Field Dependence in SalesForce
- How to Create Sample Apex Trigger in SalesForce
- How to Define Validation Rules in SalesForce
- Object Relationships Overview – SalesForce
- SalesForce Integration and Environment in Cloud Computing
- SalesForce Deployment and Assertions
- Shallow copy and Deep Copy in Cloud Computing - Salesforce
- Security and Audit Trail in Salesforce
- Salesforce SOQL
- SOSL Of Salesforce
- Standard Controller In Salesforce
- Test Class in Salesforce With Example
- Testing APEX In Salesforce
- Time Dependent Workflow Rule - Action
- Trigger Scenarios in Salesforce
- What is CRM? - A Complete Beginners Tutorial
- What is Salesforce Administrator?
- What is Salesforce CRM?
- Why You Should Learn Salesforce Skills
- Workflow Rules In Salesforce
- Configuring Tasks in Workflow Rules
- How to call APEX Class
- Context Variables
- Configuring Email alert in Workflow Rules
- Salesforce Web Services
- Salesforce Vlocity Interview Questions
- Salesforce CPQ Interview Questions
- Visualforce Interview Questions
- Salesforce Tools
- Salesforce Integration Interview Questions
- Custom Settings in Salesforce
- What is Salesforce Database?
- Salesforce Data Loader
- Salesforce Platform Events
- What is Salesforce Marketing Cloud - Definitive Guide
- Bucket Field In Salesforce - Bucket Column Salesforce
- What is Junction Object In Salesforce?
- Sharing Rules in Salesforce
- What is Salesforce Architecture?
- Salesforce Projects and Use Cases
- Salesforce Marketing Cloud Integration
- Microsoft Dynamics VS Salesforce
- Salesforce Admin Projects and Use Cases
- Salesforce Apex Tutorial
- Apex Testing and Deployment
- Salesforce Data Operations
- Salesforce Security
- Salesforce Data Modeling and Relationships
- Salesforce Integrations
- Salesforce Reporting and Data Loader
- Salesforce Career Guidance
- Salesforce Comparisons
- Salesforce Administrator Tutorial
- Salesforce Database and Custom Settings
- Salesforce Automation: Workflow Rules, Approval Processes, Governor Limits, and Bulkification
- Salesforce Development
- What is Salesforce Agentforce
- Salesforce Agentforce vs Salesforce Service Cloud
- Salesforce Agentforce Architecture
Salesforce is a unified customer relationship management (CRM) platform that seamlessly integrates business applications, customer service operations, organizational data, and metadata.
According to Salesforce, over 150,000 companies leverage its ecosystem to drive both customer and employee success.
Apex is a strongly typed, object-oriented programming language that enables developers to execute code on Salesforce servers. It helps them to implement custom business logic across various system events.
This Salesforce Apex tutorial explores the Apex programming language in depth, covering its features, capabilities, and practical applications.
Table of Contents:
- Apex Programming Language – Overview
- Salesforce Visualforce – Overview
- Controller Extension
- Custom Controller
- Standard Controller
- Triggers – Overview
- How to Create a Sample Apex Trigger
- Trigger Scenarios
- Frequently Asked Questions
Apex Programming Language – An Overview
The Apex language in Salesforce allows developers to implement complex business logic, automate business processes, and enable integrations.
Let’s go through the key pointers about the Apex programming language.
- Apex supports data manipulation language (DML) operations such as INSERT, UPDATE, and DELETE.
- It returns a list of Salesforce object (sObjects) records from queries using Salesforce Object Query Language (SOQL) and Salesforce Object Search Language (SOSL).
- It supports variable and expression syntax, block and conditional statement syntax, and loop syntax.
- It uses direct references to schema objects, such as objects and field names.
- It runs seamlessly in a multitenant environment.
- It provides support for unit test creation and execution.
Now that you understand the basics of Apex programming. To better understand how Apex works in real-time scenarios, consider going through a structured Salesforce developer training.
Salesforce Visualforce – An Overview
We’ll take a look at the Salesforce Visualforce before diving deep into Apex programming.
Visualforce is a component-based user interface framework of Salesforce.
Visualforce includes about 100 built-in UI components. It has a mechanism that allows developers to create custom components, which are reusable building blocks for user interfaces.
- It is a markup language used to determine the required view for a user.
- Every markup language is denoted through certain tags.
- Form data is sent to the Apex controller
- The Visualforce sends dynamic requests to Apex controllers
In short, component-based user interfaces are the foundation of Salesforce Visualforce. Visualforce uses a tag-based language comparable to HTML.

Controller Extension in Salesforce
An Apex class that enhances the functionality of a standard or custom controller is called a controller extension.
You use controller extensions:
-
- When you want to add new functions
- When you want to use a default function and modify the functional flow
- When you want to build a Visualforce page, even when a controller extension runs in system mode
- Building Visualforce Pages using controller extensions:
You can use Salesforce controller extensions with standard and custom controllers.
Below are the real-time scenarios that show how to use controller extensions.
- Real-time Scenario:
Apex Class
public class MyControllerExtensionExample5Mar{

public static string message{get;set;}
public static string VariableForStoringAccountName {get; set; }
public MyControllerExtensionExample5Feb(ApexPages. StandardController stdController) {
//write any code which u want to execute at the start
}
public static void ShowGreeting() {
message = 'Welcome to Extension demo' ;
}
public void mysave() {
Account NewAccount = New Account();
NewAccount. Name = VariableForStoringAccountName;
NewAccount. industry = 'Chemical';
insert NewAccount;
}
}- Steps to create a Visualforce Page: Log in to Salesforce → Setup → Build → Develop → Visualforce Pages → Click on the New button.
- Code for creating a Visualforce Page:
<apex:page standardController="Account" extensions="MyControllerExtensionExample"> <apex:form > <apex:pageBlock title="Page Block 1"> <apex:pageBlockSection title="Page Block Section 1 | Custom Controller Example" Columns="2"> <apex:pageBlockSectionItem ><Apex:commandButton value="Greeting" reRender="id1" Action="{!ShowGreeting}"/></apex:pageBlockSectionItem> <apex:pageBlockSectionItem ><Apex:outPutLabel id="id1"> {!message} </Apex:outPutLabel> </apex:pageBlockSectionItem> </apex:pageBlockSection> </apex:pageBlock> <apex:pageBlock title="Page Block 2"> <apex:pageBlockSection title="Page Block Section 2 | Standard Controller Example" Columns="2"> <apex:pageBlockSectionItem >New Company:<apex:inputField value="{!Account.name}" required="False" /></apex:pageBlockSectionItem> <apex:pageBlockSectionItem ><apex:commandButton value="Standard Save" action="{!save}"/></apex:pageBlockSectionItem> </apex:pageBlockSection> </apex:pageBlock> <apex:pageBlock title="Page Block 3"> <apex:pageBlockSection title="Page Block Section 3 | Using Custom code For Save" Columns="2"> <apex:pageBlockSectionItem >New Company:<apex:inputText value="{!VariableForStoringAccountName}" /></apex:pageBlockSectionItem> <apex:pageBlockSectionItem ><apex:commandButton value="Custom Save" action="{!mysave}"/></apex:pageBlockSectionItem> </apex:pageBlockSection> </apex:pageBlock> </apex:form> </apex:page> - Step-by-Step Explanation of the Code:
- Page Block 1 - Custom Controller Example:
- Extensions = 'MyControllerExtensionExample' [Defines the Apex Class]
- page standardController = 'Account' - [The account Name]
- page block title = 'Page Block 1' - [The section title]
- page block section title = 'Page Block Section 1 | Custom Controller Example' - [The heading of the section]
- commandButton value = 'Greeting' - [The button name]
You can click the button on the screen. It will open the APEX class and retrieve the message stored in it.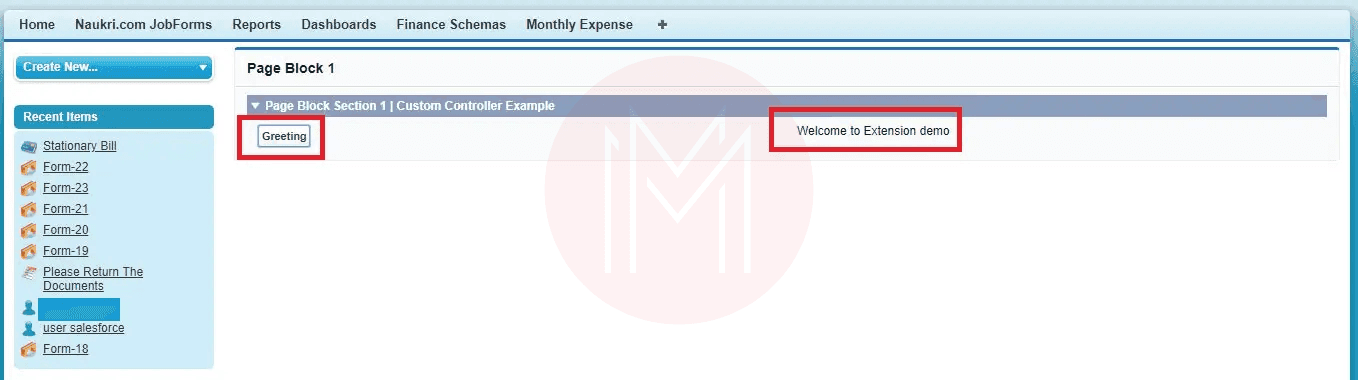
- Page Block 2 - Standard Controller Example:
- pageBlockSectionItem >New Company:<Apex:inputField - [Field input area]
- Value = '{!Account.name}' -[Object in which the data is saved]
- Required = 'False'
- commandButton value = 'Standard Save' -[Button name]
- Action = '{!save}'
Here, you can save data to the default ‘Account’ object.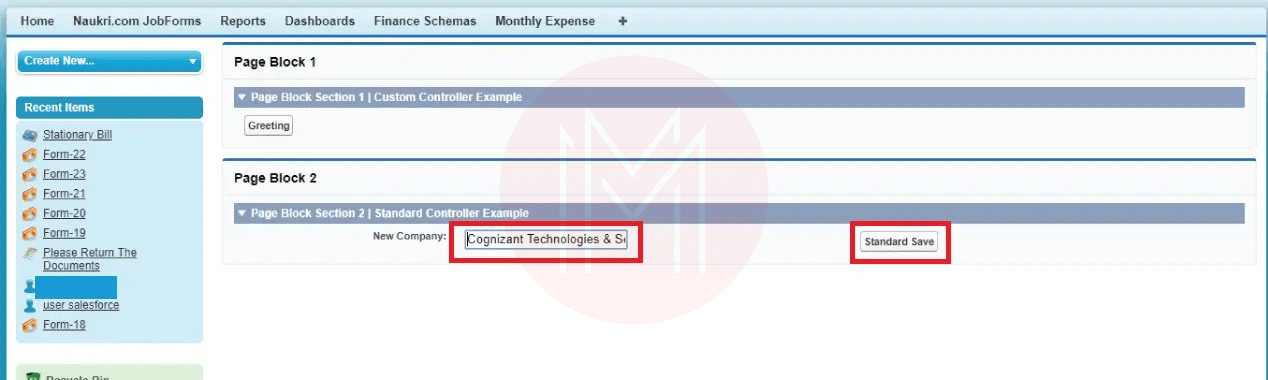
- Section - Page Block 3 - Custom Controller Example (DML in Apex Class):
- pageBlock title='Page Block 1' - [The section title]
- pageBlockSection title='Page Block Section 3 | Using Custom code For Save' - [The heading of the section]
- commandButton value='Custom Save' - [Button name]
- action='{!mysave}'
The result is shown below.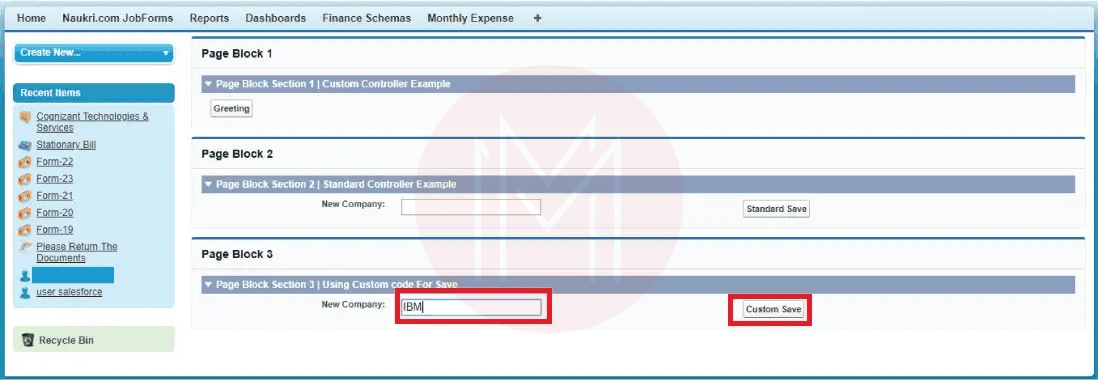
- Page Block 1 - Custom Controller Example:
Custom Controller in Salesforce:
A custom controller is an Apex class that executes the logic of a Visualforce page without a standard controller. Use custom controllers to run Visualforce pages completely in system mode.
Custom controllers in Salesforce allow data manipulation and custom logic for Visualforce pages. They are used to fetch and manage data displayed on Visualforce pages.
You can use a custom controller when you need to:
-
- override the embedded services of a regular controller
- include new actions
- develop Visualforce pages that follow user permissions
Types of Custom Controller:
- Standard Controller – you can use it to interact with and access the structured business data present in the records.
- Custom Controller – you can use them to develop customised functionality and replace existing functionality.
- Controller Extension – use it to extend the functionality of a custom or standard controller.
Create a Custom Controller Apex Class:
Apex provides many utility and system classes for developing custom controller logic. To create a custom controller class, you need to follow the steps below:
- Step 1: Go to the Developer Console and click File → New → Apex Class to establish the new Apex class. Name the class as 'EmailidListController'
- Step 2: Open the editor, replace the code with the code below:
- Step 3: Visit the Visualforce page again and save it.
- Step 4: To view the Visualforce page preview, click the preview button.
Creating a Visualforce page that uses a Custom Controller:
- Step 1: Go to the Developer Console and press File/New/Visualforce Page to create the latest Visualforce page. Name the page 'EmailidListController'
- Step 2: Go to the editor, replace the markup with the following code:
<apex : page : controller="EmailidListController">
<apex : form>
< Apex: page block: Email Id List id =" Email Id_List">
</apex : pageBlock>
</apex : form>
</apex : page>
Controller Methods:
Below are the controller methods used in Salesforce Apex.
- Action Methods: You can use action methods when a page event occurs. It can be a user clicking a button. Action methods are invoked through (!) notation.
- Getter Methods: These methods retrieve values from the controller. Each value determined by the controller and displayed on a Visualforce page must have a getter method.
- Setter Methods: These methods are used to send particular values to the controller. They are executed automatically before the action methods.
In summary, custom controllers implement the logic of Visualforce pages.
Standard Controller in Salesforce
Standard controllers can be used with many objects, including Asset, Case, Contact, Product, Contract, and more.
Visualforce uses Model-View-Controller (MVC) techniques to display data. They can be described as follows:
- Model - It comprises application data and does not include the logic required to present it.
- View: It comprises the model's data.
- Controller – It handles the events invoked by the view and implements a suitable response to them.
Accessing data with a Standard controller:
Each standard controller has a getter method that gives the record mentioned by the 'name' query string argument in the page URL.
This method enables the related page markup to reference the fields of the selected record using the {!object} syntax, where the object related to the controller is written in lowercase.
Example::
If a page uses an account standard controller, it uses (!account.name) to determine the value of the name field.
Standard Controller Actions:
The standard controller Actions are as follows:
- Save: This action inserts a new record and updates an existing one if available. When this action is completed, the save action returns to the starting page.
- Quicksave: This action inserts a new record and updates an available record, and the 'quicksave' does not redirect users to the initial page.
- Edit: Through this action, users can edit the page for the available record. When this task is completed, the edit action returns the user to the page.
- List: It gives a Page reference object of the normal List page.
Styling Pages Through the Standard Controller:
The page for a standard controller systematically inherits the style used for regular Salesforce pages for the specified object.
Pick the object that looks to be chosen. You can overrule the page styling that uses the standard controller through the 'tab style' property of the <Apex: page> tag.
Example:
<apex: page StandardController=" MindMajix" tabstyle="Python training">
</apex : page>
Validation Rules and Standard Controllers:
If a user enters data on a Visualforce page that accesses a standard controller and that data triggers a validation rule fault, the fault can be displayed on the Visualforce page.
If the validation rule error is at the top of the page, you will use the <Apex:pageMessage> or <Apex:message> component within the <Apex:page> to display the error.
Salesforce Exception Handling – An Introduction
An exception is an abnormal event that typically occurs during program execution. It affects the normal program flow.
- It is a runtime error that halts execution.
- Another name for a runtime error is an exception. There are two types of errors.
- Syntax error (or) Compile time
- Runtime error (or) exception
- A compile-time (syntax) error occurs whenever you violate the syntax of the language. The only way to overcome this scenario is by changing the source code.
- In case of a runtime error, it might not be due to a programming error but to the runtime environment.
Exception Handling is a feature in Salesforce that allows us to handle unexpected exceptions or errors in our code without interrupting the flow.
- Interface: It is a set of method definitions. It is a special type of encapsulation, in which you have member methods and prototypes.
Prototypes:
They return the type name (list and sequence of input declarations). One basic reason you need interfaces is that multiple inheritance is possible only through them.
- Interfaces enforce a class to perform certain operations (actions)
- The protocol between the class and the interface is that the class must implement (define) all the method prototypes defined in the interface.
- The actual technical reason behind creating an interface is not multiple inheritance. The operating system-level services use their names and purposes behind the interface.
Syntax for interface:
Interface name {
Prototypes
}
Class child implements name {
Features are mandatory to define the prototyped methods in the interface
}
Example:
Global interface calc {
Void add ();
Void sub ();
}
Class opers implements calc {
Return a+b;
}
Public integer sub () {
Return a- b ;
}
}
Public class test {
Public static test method void main () {
Opers op1 = new opers ();
Op1.add (5,4);
System. debug (' subtraction is ' +sub);
}
}
Collections:
It stores large volumes of information. There are three types of collections in Salesforce.
- List – A collection of similar elements that is also resizable.
- Set – It provides unique values and is resizable.
- Map – A collection of key-value pairs. Every pair is associated with a key and a value.
SOQL:
You can use Salesforce Object Query Language (SOQL) to retrieve the data by using a 'select' statement. You can search only for Salesforce objects in SOQL.
SOSL:
You can use Salesforce Object Search Language (SOSL) to retrieve the data from the database. You can use the FIND statement for this.
Collection Program:
Public with sharing class call test 1 {
Public static test method void main () {
List < string > stud_names = new list < string > ();
Stud_names. Add ('Ashok');
Stud_names. Add ('Yadav');
Stud_names. Add ('Buddi');
For (string str: stud_names) {
System. Debug ('name; ' +str);
}
List prog_books =new list ();
Prog_books = <
Book_c Sb = new book_c ();
Sb. name = 'apex prog';
Sb.price _ c = 200;
Sb. Author_c = 'krishna';
Try {
Insert prog_books;
}
Catch (exception e) {
System.debug ('exceeded limit');
}
Prog-books = <
For (Book_c b: prog_books){
System.debug (b. price_c);
System.debug (b. author_c);
}
}
}
Triggers:
Triggers are apex code that executes in response to database events.
- Syntax:
Trigger trigger name on object name (trigger_events){
Code_block
}
- A trigger is Apex code that executes before or after specific DML events occur. It can be before object records are inserted into the database, or after records have been deleted.
- Triggers are stored as metadata in Salesforce.
- You can only create triggers from the associated object, not from the Apex triggers page.
There are two types of triggers.
- Before Trigger
- After Trigger
Context Variables:
The context variables provide runtime information about the trigger and the database. These variables are listed below.
- Isexecuting: It returns true if the trigger is executing; otherwise, false.
- Trigger.isBefore: It returns true if this trigger has been executed before any record is saved.
- Trigger.isAfter: It returns true if this trigger has been executed after all records were saved
- Trigger.isInsert: It returns true if this trigger has been executed due to an insert operation, available from the Salesforce user interface, Apex, or the API
- Trigger.isUpdate: It returns true if this trigger was fixed due to an update operation, from the Salesforce user interface, Apex, or the API
- Trigger.isDelete: It returns true if this trigger was fixed due to a delete operation, from the Salesforce Apex, or the API
- Trigger.isUndelete: It returns true if this trigger was fixed after a record is recovered from the recycle bin
- Trigger.new:
- It reflects the database's new state.
- It returns a list of the new versions of the subject records.
- The sObject list is available in insert and update triggers.
- The records can only be modified in ‘before triggers’
- Trigger.old:
- It contains the history of object records.
- It reflects the previous state of the database
- It returns a list of older versions of the subject records
- The sObject list is available in update and delete triggers.
- Trigger.newMap:
- A map of IDs to the new versions of the sObject records
- Note that this map is only available in ‘before the update’, ‘after insert’ and ‘after update’ triggers.
- Trigger.oldMap: A map of IDS to the old versions of the sObject records. This map is only available in ‘update & delete’ triggers.
Example:
Trigger t1 on food_c (before insert) {
Last < food_c> fc = trigger. New ;
For (food_c f:fc)
{
If (f. price_c <300)
{
f. add error ('do not eat too much');
}
}
}
Example:
Trigger t1 on student_c (before insert, after insert, before update, after update) {
+ List < student_c> b= trigger. New
For (student_c S : b) {
If (S. name_c == 'harishnath') {
S. add error ('do not allow this student');
}
}
}
How to Create a Sample Apex Trigger in Salesforce:
- Apex Trigger:
Apex is a strongly typed, object-oriented programming language that allows developers to execute flow and transaction control statements on the Salesforce platform server.
Apex Code can be initiated by Web service requests and from triggers on objects.
Apex is generally of two types:
-
- Schedulable Apex
- Batchable Apex
- Schedulable Apex:
There is an Apex interface that is schedulable.
Example:
Schedulable {
Void executes (schedulable context sc)
}
Class time bomb implements schedulable {
Void executes (schedulable context Sc) {
System.debug (' I love the world');
}
}- Batchable Apex:
Batch Apex operates over small batches of records, covering your entire record set. It breaks the process down into manageable chunks.
The Interface used for a batch Apex is Database.Batchable, where the database is a namespace or class containing the Batchable interface.
- Methods in Interface
An interface is a class in which the method signatures are present, but the body of the method is absent.
The following are the methods of an interface.
-
- Start
- Execute
- Finish
Trigger Scenarios in Salesforce
In Salesforce, Triggers are known as Apex Triggers. The triggers are unique. A trigger in Salesforce is Apex code that you can use to run operations before and after a record is updated.
- Important Points for Trigger Scenarios
As per the execution order, you have two types of triggers:
-
- Before the trigger
- After the trigger
- Before the Insert Event
While using this event, you can execute the code block before you insert a new record. Data is committed to the database after the Insert event.
When using this event, execute the code block first. After that, you will insert the record.
You can use the before trigger to perform the logic on the same object. You can use the ‘before event’ trigger if you need to update the same record in the trigger.
In the before trigger, the records are not committed to the database. Therefore, you will skip the DML.
When the record is committed to the database, i.e., the record ID is created, our trigger records it in read-only mode. You cannot update the values.
- Keywords of Trigger Syntax:
- Trigger name: It is the name that you must give to your trigger.
- Object name: It is the object over which you must act.
- Trigger_events: The list of events separated by commas.
- Real-Time Trigger Scenarios:
-
- Scenario 1: Create 'Sales Rep' with data type on the Account object. As you create account records, account owners will be automatically populated in the sales representative field. As you update the account owner record, the sales representative will be updated accordingly.
Description:
-
-
- Step 1: In the above trigger scenario, you need to fire the trigger before account creation, so you use the 'before insert' trigger on the Account object. Likewise, per the requirement, you update the 'before update' trigger on the Account object for the update event.
- Step 2: You can use 'set' to store the 'IDs' because you don’t require duplicate IDs for the account owner. So, you create an instance for that, like the 'SetAccowner'.
- Step 3: After that, you use the 'For' loop for all the new accounts. Therefore, you can use 'Trigger.new' in the loop. In the 'For' loop, you can add the account 'OwnerID' to the set.
- Step 4: After that, you can create the instance of the map 'user map' that stores 'value = user' and 'Key = ID' along with the query. SELECT Name FROM user WHERE Id IN: setAccowner
- Step 5: After that, in the following 'for' loop, you create the 'usr' instance for the user, which is equivalent to the Account 'owner' that you get from 'map'.
- Step 6: In the end, the sales representative's sales_rep_c' is equivalent to 'usr. Name'
- Scenario 2: Create a checkbox field named 'Contact Relationship' on the contact object, and generate an object named 'Contact Relationship' that is associated with contacts. Develop logic to create a connection by verifying the contact relationship checkbox; after that, the relationship is established systematically for the contact. Trigger:
-
Description
-
-
- Step 1: According to the requirements, you trigger the operation when a user submits a record, so you need to use the 'after insert' trigger. After that, when you must check about an event, you use a ‘trigger. insert' and 'trigger.isAfter' to dismiss the trigger on these specific events.
- Step 2: After that, you create an instance of the Apex class 'ContactMasterHandler' as 'ConIns'. After that, you call the 'callContactRelationshipByContact' method from the Apex class.
- Step 3: Let us look at the Apex method 'createContactRelationshipByContact,' which takes the contact list in the IstCon instance.
- Step 4: After that, you create an instance of List of Contact_Relationship_c called 'conlist' to store 'Contact_Relationship_c' records.
- Step 5: Then, you create a 'for' loop over all the recently created contacts in Salesforce. After that, 'newcon.Contact_Relationship_c' is a field from the created contact.
- Step 7: After that, you create the instance for the 'Contact_Relationship_c' object, like 'CR'.
- Step 8: After creating the 'CR' record, you give the name the same as the newly established contact's 'LastName'. Contact is equivalent to the newly established contact's ID.
- Step 9: After that, you add 'CR' to the 'ConList' and, by 'Inserting', you insert the 'Contact_Relationship_c' record in Salesforce.
-
Well! This Salesforce Apex tutorial might have given you the skills to develop Salesforce applications in real-world scenarios.
Frequently Asked Questions
1. Is it easy to learn Salesforce Apex?
Ans: Yes, learning Salesforce Apex is quite easy. Gaining some knowledge of OOP concepts will help you learn Apex programming more quickly.
2. When should I use Salesforce Apex?
Ans: You should use Salesforce Apex when tools like Process Builder or Flow Builder are insufficient for developing complex Salesforce solutions.
3. How long will it take to learn Salesforce Apex?
Ans: You can learn Salesforce Apex language in 2-3 weeks. If you work through more hands-on exercises after the training, it will help you become a skilled Salesforce developer more quickly.
4. Is Apex similar to other programming languages?
Ans: Yes, Apex is similar to Java programming. Java developers can easily learn Apex programming.
5. Can I get any Salesforce Apex learning resources?
Ans:
Conclusion:
Salesforce Apex empowers you to build customizable Salesforce applications. We hope you have gained sufficient mastery of Salesforce Apex concepts to help streamline business processes and enhance productivity.
If you want to explore more about Salesforce Apex, you can join MindMajix’s Salesforce developer training. By the end of the training, you will become a skilled Apex developer with the capacity to build high-quality Salesforce applications.
Public class EmailidListController {
Code
}
On-Job Support Service
Online Work Support for your on-job roles.

Our work-support plans provide precise options as per your project tasks. Whether you are a newbie or an experienced professional seeking assistance in completing project tasks, we are here with the following plans to meet your custom needs:
- Pay Per Hour
- Pay Per Week
- Monthly
| Name | Dates | |
|---|---|---|
| Salesforce Training | Jun 27 to Jul 12 | View Details |
| Salesforce Training | Jun 30 to Jul 15 | View Details |
| Salesforce Training | Jul 04 to Jul 19 | View Details |
| Salesforce Training | Jul 07 to Jul 22 | View Details |


