
- Dell Boomi vs MuleSoft
- Mulesoft Interview Question And Answers
- Introduction to the MuleSoft Anypoint
- Mulesoft vs Zapier - Key Difference
- Mulesoft vs WebMethods - Key Difference
- Mulesoft vs Alteryx - Key Difference
- What is Mulesoft
- Mulesoft vs Informatica - What's The Difference?
- Mulesoft Architecture
- MuleSoft API Led Connectivity
- MuleSoft vs TIBCO - The Key Differences
- Mulesoft Connectors
- What is MuleSoft Developer?
- How to Install Anypoint Studio on Windows
- Mulesoft Integration with Salesforce
MuleSoft is an integration platform that connects applications, data, and APIs across cloud and on-premises, and now AI agents. This is a complete Java-based platform that integrates with enterprise systems such as Salesforce, SAP, and Workday, as well as databases.
It enables communication between different systems using APIs, web services, messaging, and connectors. It is a complete hybrid enterprise integration platform for SOA, SaaS, and APIs, called AnyPoint.
Let’s dive into the MuleSoft tutorial.
Table of Contents
- MuleSoft ESB Overview
- Architecture
- DataWeave 2.x
- AI Features
- Components
- Mule Message Components
- Error Handling in Mule 4
- Integration Methods
- Functionalities of ESB
- Advantages
- Download and Installation
- Mule Anypoint Studio Overview
- Applications
- Conclusion
- FAQs
MuleSoft ESB - Overview
MuleSoft allows developers to connect to and interact with any application, regardless of the language used to build it, in a very flexible manner. It establishes an active communication channel between the integrated applications to exchange data over a reliable, secure platform.
MuleSoft is a SaaS platform that minimizes reliance on large-scale hardware setups and reduces hardware installation costs. You can choose the following MuleSoft editions based on your needs.
- Community Edition
- Enterprise Edition
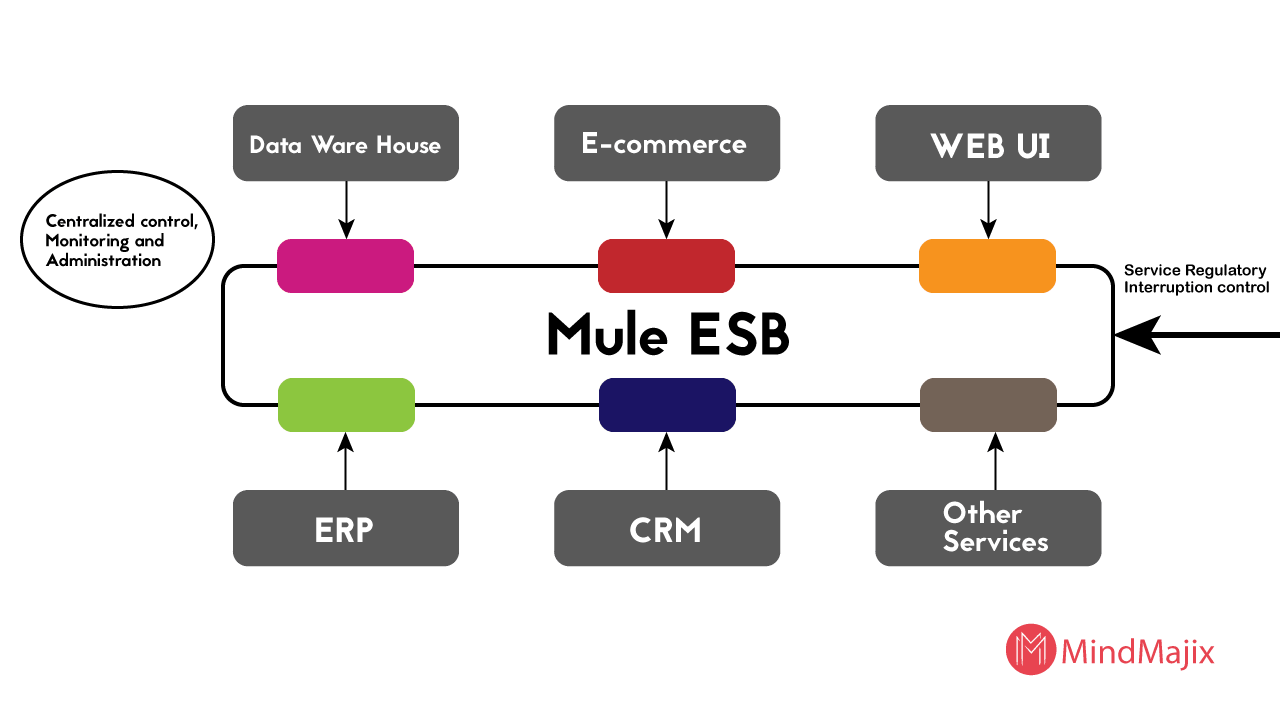
MuleSoft ESB (Enterprise Service Bus) is middleware that integrates multiple applications using a linear, bus-like architecture. It gives you the flexibility to create communication channels between critical applications that support service operations.
It also reduces the need for a complex hardware configuration to support such a large-scale application by streamlining integration with the cloud-based platform.
It is an efficiently designed infrastructure that supports uniform communication and data exchange through various applications.
Why ESB?
ESB has a vast integration architecture that allows us to integrate and operate N applications through a single platform. Let’s see some of the important areas where you can use ESB features.
- API-led Connectivity: It is MuleSoft’s core methodology for building reusable integrations. There are three layers in API-led connectivity: system APIs, process APIs, and experience APIs. System APIs connect directly to backend systems. Process APIs implement business logic and transformations. Experience APIs customize data for a specific channel or consumers.
- Integrating Multiple Applications on a Single Platform: When you need to integrate one or more services or applications, Mule ESB meets the requirement.
- Migrating the Application to the Cloud: ESB makes it easier to scale to meet increased user demand. It handles scaling the application process up and down with ease. You can easily deploy a new application or migrate an existing one without any infrastructure issues affecting the other application.
- Utilizing the Benefits of Multiple Network Protocols: ESB uses FTP, HTTP, and JMS to ensure the secure transmission of data between applications.
- Message Routing Feasibility: ESB also routes messages between applications, ensuring a smooth communication network. The message header, body, and payload can be transmitted between endpoints in this ecosystem.
- Consumption and Composition: It is useful if you need to publish services with composition and consumption.
Guiding Principles Provided by ESB
The guiding principles of ESB are also known as the Core Principles of Mule.
- Orchestration: It is the process of synchronizing two or more applications to ensure a continuous flow of data and processes.
- Transformation: The process of converting data from a raw format into an application-specific data format.
- Transportation: It is a process similar to the transport layer that enables message transmission over FTP, HTTP, and JMS.
- Mediation: It provides multiple interfaces to support interactions with multiple applications and service versions.
- Non-Functional Consistency: This guideline ensures mechanical support for transaction handling and security within the integrated environment.

Mulesoft Architecture
MuleSoft follows a three-layer architecture for application integration and data processing, including:
- Application Layer
- Integration Layer
- Transport Layer.
The architecture is shown in the diagram below.
DataWeave 2.x Language
DataWeave is Mule4’s built-in transformation and expression language. You can use this language to transform, query, filter, and manipulate data in Mule 4 applications. It allows you to use concise, functional syntax to transform data between JSON, XML, and CSV formats.
Key Features
- DataWeave is a functional programming language that uses expressions, functions, and immutable variables.
- It filters records and maps fields efficiently.
- It allows function reuse.
- It supports built-in modules, including string, date, arrays, and objects.
- It integrates with Mule 4 and transforms message components.
AI Features of the MuleSoft
Let’s explore the AI features of MuleSoft now.
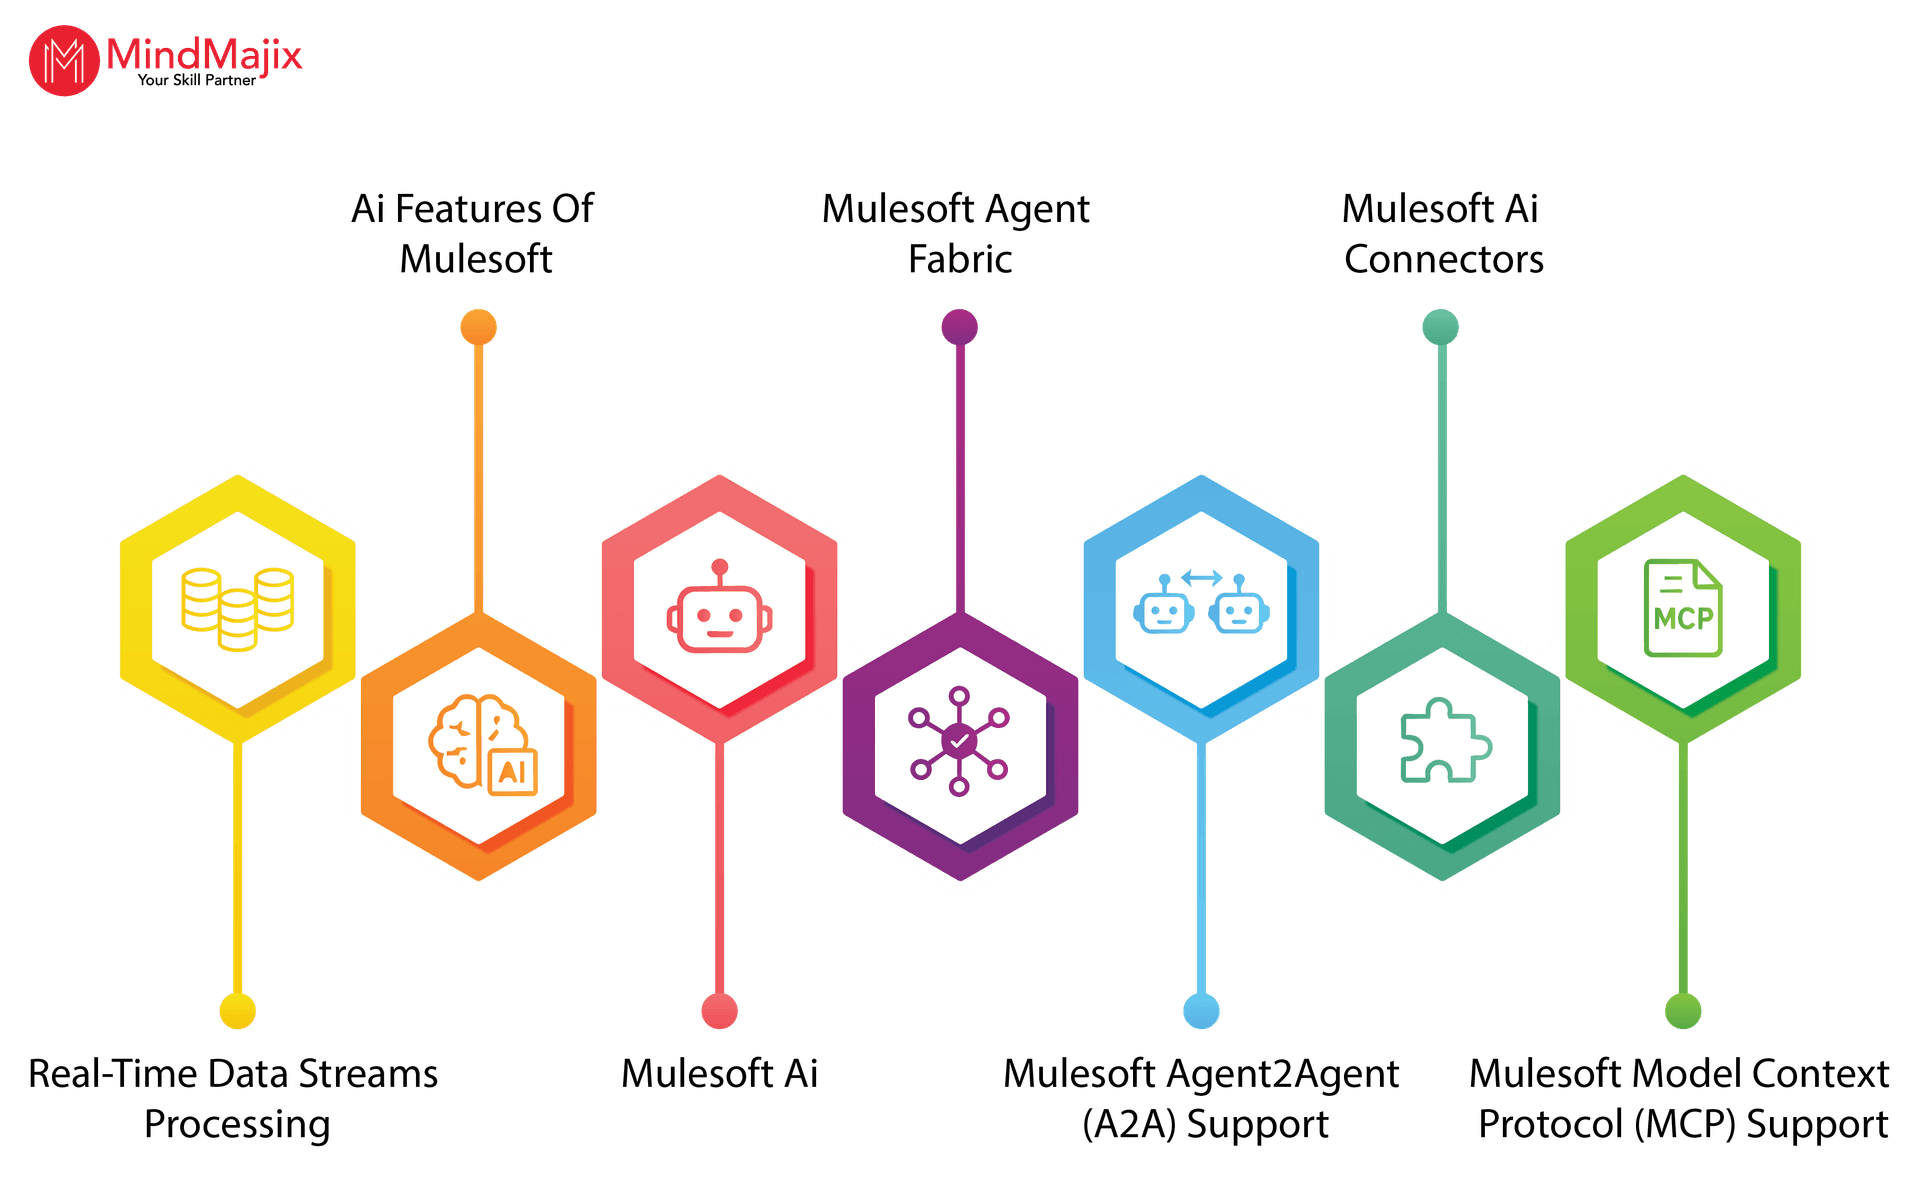
- MuleSoft AI – This tool helps organizations build, manage, and deploy AI agents and agent networks.
- MuleSoft Agent Fabric – This tool converts uncontrolled agents into a governed, coordinated network. It enables you to manage complex processes that require multiple agents while ensuring robust security.
- MuleSoft Agent2Agent (A2A) Support – You can leverage this feature to enable agents to communicate, collaborate, and enforce governance policies for organizations.
- MuleSoft AI Connectors – They are built-in connectors that organizations can use to integrate AI capabilities into their workflows.
- MuleSoft Model Context Protocol (MCP) Support – You can use this feature to transform any API into a structured, agent-ready asset.
MuleSoft Components
Mule Development can be configured and customized into three categories of tasks.
1. Service Component Development
This task involves reusing the POJOs and Spring beans. Developers with Spring development experience can easily understand how to use POJOs and Spring Beans.
Build application flows using connectors and rely entirely on DataWeave for data transformations, making Java and Spring beans strictly optional.
Design scalable integrations by replacing legacy service components with a modern API-led connectivity architecture.
2. Service Orchestration
It acts as a service mediation layer that enables integration by configuring message processors, Adaptors, and routers with transformers and filters.
3. Integration
Integrating various applications is crucial to large-scale application development. It provides great flexibility in connecting to many different applications, regardless of the protocols they use.
By using the transport method, you can allow messages to travel from one end to the other in the source and destination channels. It establishes a high-level communication association between the applications to transmit messages within the environment.
You can use any available transport method or customize it as per your needs.
Mule Configuration Architecture
The Mule configuration consists of the components listed below.
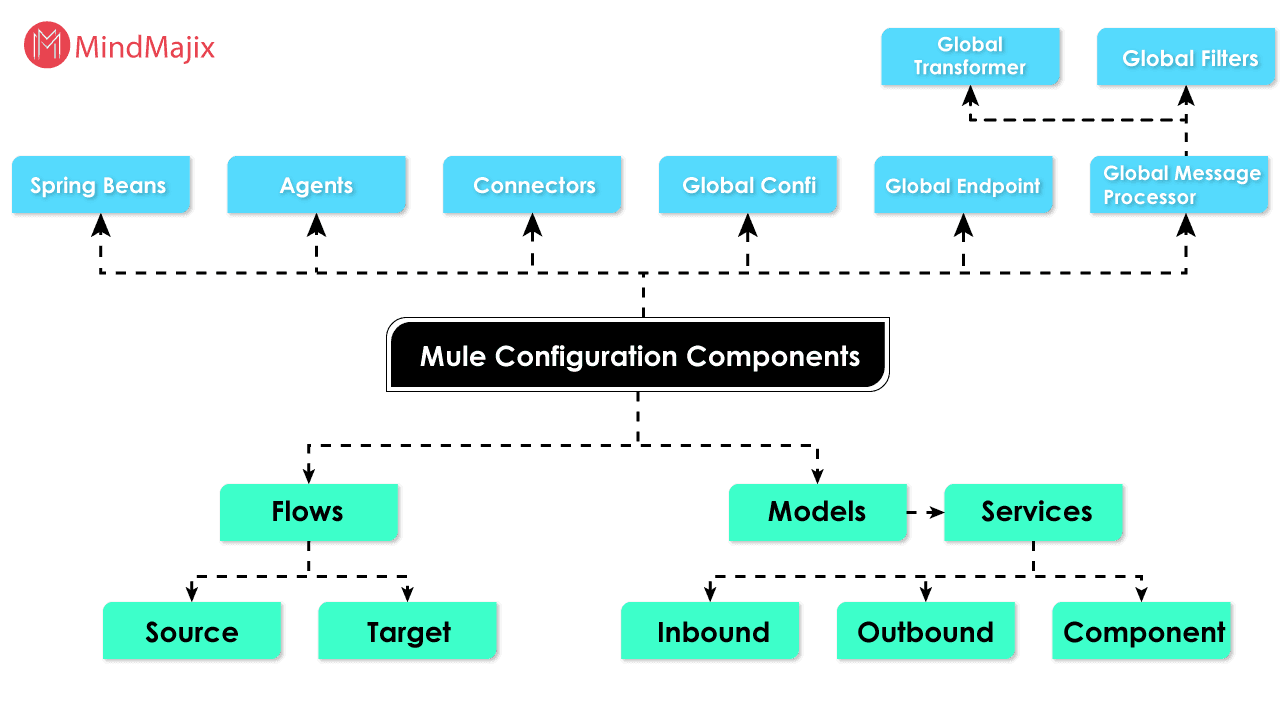
Mule Message Components
A Mule message is the fundamental unit of data that flows through an application. Every message has key components such as:
- Payload
- Attributes
- Variables.
Let’s take a close look at these components.
- Payload – It is the actual data being processed. The data can be JSON, XML, CSV, strings, binary data, and more.
- Attributes – They contain the metadata about the payload. The connector that receives the message generates attributes such as HTTP headers, URI parameters, and JMS properties.
- Variables – They are user-defined values that you can store while executing flows.
Error Handling in Mule 4
It is a framework that you can use to detect, manage, and recover from runtime errors in Mule applications. It uses the type error model, which helps manage exceptions more easily.
Error handler, On Error Continue, and On Error Propagate are error-handling components.

MuleSoft Integration Methods
1. Methods to Implement ESB
The purpose of the Mule ESB is to separate applications and enable them to communicate via a highly scalable, high-speed network Bus. It’s a foolproof, controllable network system that also minimizes the risk of data loss. ESB can be implemented using the Adapter and the BUS as follows.
Mule uses messaging protocols such as JMS and AMQP to provide bus connectivity, separating applications from one another. The bus implementation can only be achieved through Mule Servers.
Adapters act like a telephone network, allowing you to communicate with people. Similarly, the adapter allows you to build a communication network for exchanging data between applications.
ESB Bus enables the consistent flow of data and information between applications. This way, Mule enables great application communication on a single platform.
Rather than using multiple applications and APIs across different networks to manage your application, Mule provides a cloud-based platform for application communication and interaction.
Adapters are not single-end operation controllers; they also handle security, network errors, monitoring, and message routing.
2. Difference Between Point-to-Point Integration and ESB Integration
For a middle- or higher-level application, the number of integrations increases rapidly as requirements grow to provide services, web hosting, messaging, database manipulation, storage, and many other related concerns.
With the P2P integration technique, you can build an architecture to support the application, but it will become complex as the number of applications increases.
Also, P2P has limitations in platform compatibility and language support.
Let's take an example to understand this concept.
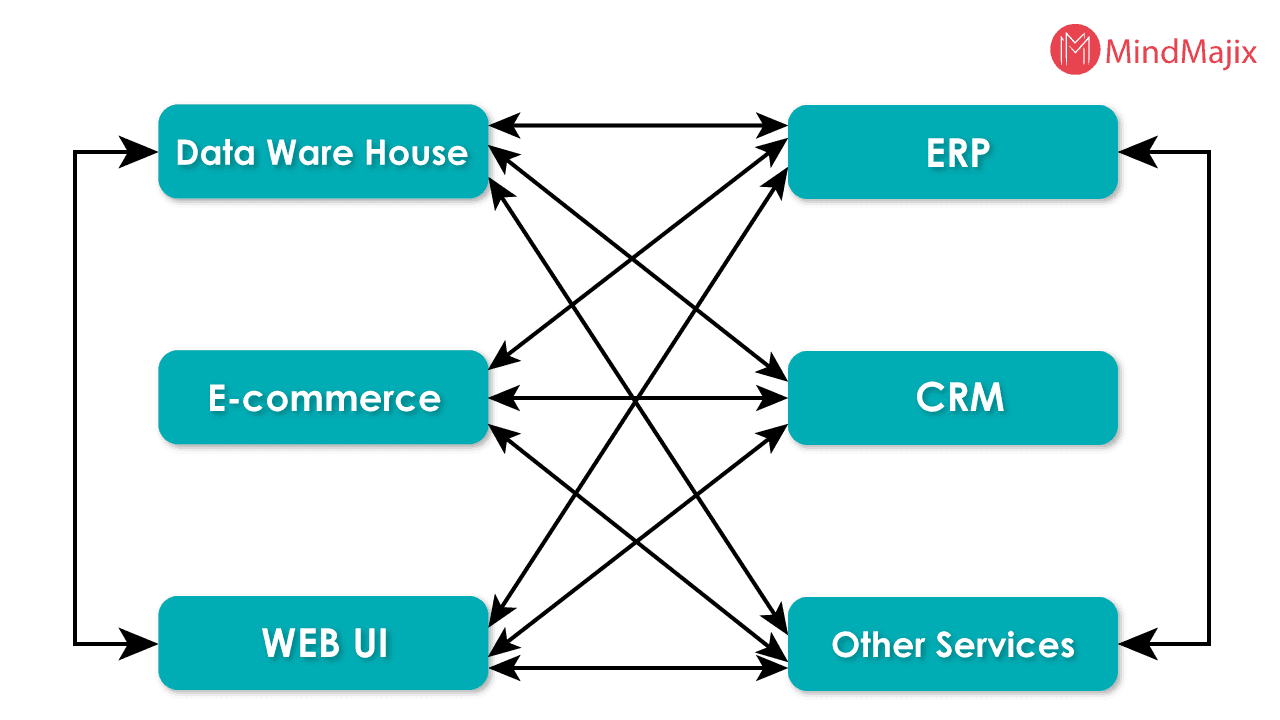
The limitations of platform connectivity and the complexity of integrating multiple applications necessitate the use of Mule ESB.
Mule ESB provides good integration flexibility, without concerns about language support or compatibility across different application architectures.
It enhances the application reusability by encapsulating functionality in a single platform. You can integrate applications in a synchronized manner, as shown in the image below.
Functionalities of ESB
Validate (V): Schema validation is handled by Validate. ESB uses a validation parser and an updated schema to validate the schema outlines. For example, you can check the XML document against a schema.
<?xml version="1.0" encoding="UTF-8"?>

<note>

<to>Jony</to>

<from>America</from>

<heading> Caller Reminder </heading>

<body>Lets learn Mule this weekend! </body>

</note>
Enrich (E): The purpose of enriching is to add additional data to a message. It simply adds more meaning to the destination user.
Transform (T): The process of converting data into a sequential format that is easily accessible to the requesting application is called transformation.
For example, when you travel abroad, you need to exchange your currency for the destination country's currency, which makes transactions there easier.
Similarly, data must be transformed into a specific format for the requesting application to consume.
Routing (R): You can call it an endpoint or gatekeeper of the service, which provides a route for services to communicate between the source and destination.
Operate (O): The word operates itself defines the functionality performed by the component. It either invokes the required services or communicates with the targeted application to process the service.
Visit here to learn MuleSoft Training in Hyderabad
Advantages of Mulesoft ESB
Mule ESB offers a wide range of application support features, such as
- It offers a simple drag-and-drop graphical design to ease UI design complexities.
- It supports visual data mapping and transformation, providing more effective and meaningful insights.
- You can access more than 100 pre-built connectors for applications.
- It gives you a centralized monitoring and administration console.
- It provides robust enterprise security features for operation on an ultra-secure platform.
- It provides access to numerous APIs to support and enhance your application.
- It allows you to operate via a secure Gateway connection and protects against on-premises and cloud-based data threats.
- Service Registry manages the publication of data and services through registered access.
- You can get access through the web-based management console.
- A service flow analyzer allows you to test applications and services rapidly.
How to Download and Install Mule 4?
First, you need to understand the system and application configurations required to run Mule code.
You need to verify that your system has the Java JDK installed. You can download JDK 17 to support the Mule configuration.
OS supported by Mule 4:
- Windows 10
- Windows Server 2019 and later versions
- Linux (Ubuntu Server and Red Hat Enterprise Linux)
- AIX
- MacOS
- Solaris.
Once you are ready with Mule, let’s check the database required for running the Mule application.
Databases:
Mule runs its standalone server, so you do not require any additional database application support for this.
But if you are required to process or access data in Mule, you need the following server configuration. allow you to use the application server.
- Microsoft SQL Server
- MySQL
- PostgreSQL
- IBM Db2
- SAP HANA
- SQLite.
Hardware Requirements:
- Minimum of 2 GHz processor
- Minimum of 2 GB RAM
- Minimum of 4 GB free storage.
You can download Mule from its official website at:
https://www.mulesoft.com/lp/dl/mule-esb-enterprise
Download the Mule 4 Zip file to your local system.

Installation:
Unzip the downloaded file and run the Mule 4 binary executable(.exe). Set the environment variable as MULE_HOME and create a Mule directory under the folder where you have extracted the downloaded file.
Let’s take an example of a Windows environment and see how you can set the environment variable.
You can set the variable in the Windows or Linux/Unix environment to version 4.9.0.
Windows Environment Variable:
Linux/Unix Environment Variable:
Once the environment variable is set, you are ready to run the command to check whether Mule is working fine or generating an error in your system.
Windows Command for Mule Testing
$ $MULE_HOMEbinmule.batLinux/Unix for Mule Testing
$ $MULE_HOME/bin/muleUsing the command above, you can run Mule in foreground mode. Once this command is activated, you cannot run any other command in the terminal. To stop a running command, press Ctrl-C.
The Process to Start Mule Services:
There are two ways to start Mule services. You can either start as Windows services or as Linux/Unix daemon services.
Let’s start with Windows services:
Follow the steps given below to start Windows services.
Install Windows services by using the following command
$ $MULE_HOMEbinmule.bat installRun Windows services using the below command
$ $MULE_HOMEbinmule.bat startLet’s take another example to start Linux/Unix Daemon services using Mule.
Install Linux/Unix services by using this command.
$ $MULE_HOME/bin/mule installOnce installed, you can run the Linux/Unix services with the following command.
$ $MULE_HOME/bin/mule startThe following is an example of how to start Mule as a daemon service.
Deployment Models:
You can deploy Mule applications in multiple ways. All the deployments are managed through the AnyPoint Runtime Manager.
- CloudHub is a fully-managed iPaaS that supports automatic scaling, monitoring, and high availability.
- CloudHub 2.0 is built on containerized infrastructure. It provides enhanced scalability and resource management.
- Runtime fabric is a container-based deployment platform that can run on Kubernetes clusters, virtual machines, and physical servers.
CI/CD with the Mule Maven Plugin:
This plugin automates the building, testing, packaging, and deployment of Mule applications. It packages applications, runs MUnit tests, and publishes assets to the Exchange and deploys to CloudHub 2.0.
Jenkins, GitHub Actions, GitHub CI/CD, and Bamboo are some of the CI/CD tools used in MuleSoft.
| Check out MuleSoft Interview Questions and Answers that help you grab a high-paying job. |
Mule Anypoint Studio - Overview
Mule Anypoint Studio is an IDE (Integrated Development Environment) created for testing and designing Mule applications. It’s a user-friendly Eclipse-based IDE.
Mule Anypoint Studio is an Eclipse-based IDE for developing Mule applications and designing integration flows.
Downloading Mule Anypoint Studio
First, you need to have the JDK installed on your system. Verify that you have the correct supported version of Java JDK installed on your system.
Every operating system has its own process for downloading and installing new applications and services.
Let's see how to install Anypoint Studio on your Windows system.
- Click the link below to download Windows Anypoint Studio, and choose the Windows-compatible setup https://www.mulesoft.com/lp/dl/anypoint-mule-studio
- Extract the downloaded bundle into the root folder of your system, ‘C:’.
- Open the setup file
- Click OK to accept the default workspace or customize it to suit your needs. The welcome message will flash on the screen once it’s installed properly.
- Click on the ‘Get Started’ button, and here you are ready to go with Anypoint Studio.
Anypoint Platform Components
Let’s understand some of the key Anypoint Platform components in the following.
- Anypoint Studio - It is an Eclipse-based IDE that you can use to develop Mule applications and APIs
- Design Center - It is a browser-based tool that you can use to design APIs using RAML or OpenAPI specification (OAS) and create integrations
- API Manager - It enforces security policies and manages the API lifecycle.
- Runtime Manager - You can use this tool to deploy, manage, monitor, and scale Mule applications.
- Anypoint Monitoring - It provides users with dashboards, metrics, logs, and alerts.
Key Features of AnyPoint Studio
Mule Anypoint Studio helps enhance the productivity of your Mule applications as you build them. Anypoint Studio provides a variety of features to support Mule development.
Let’s see some of the key features of Anypoint Studio.
- Mule Anypoint Studio provides an instant run environment for Mule development.
- It provides a visual editor for configuring API definition files and Mule Domains.
- Mule Anypoint Studio comes with an embedded unit testing framework that enhances productivity.
- It provides built-in support for developing and deploying applications to CloudHub 2.0.
You can integrate with an exchange to import templates, examples, definitions, and other resources from an organization with access to Anypoint Studio services.
API Specifications - RAML and OpenAPI
Mulesoft supports both RAML and OpenAPI. RAML is the API specification language used in MuleSoft’s API-first development approach.
You can use RAML in Design Center and Anypoint Studio to design APIs.
Similarly, Mulesoft supports the OpenAPI specification (OAS) 2.0 and 3.x. You can import existing API definitions into MuleSoft using OAS. OpenAPI is highly helpful when integrating with external systems.
Omni Gateway (Formerly Flex Gateway)
It is MuleSoft’s lightweight API gateway. You can use this gateway to manage both Mule and non-Mule APIs. It helps implement consistent security policies across different environments.
It supports both hybrid and multi-cloud deployments and integrates with DevOps and CI/CD pipelines.
Anypoint Code Builder (ACB)
It is MuleSoft’s next-generation, AI-powered IDE for designing, developing, and deploying APIs and integrations. You can use it as a desktop IDE and a browser-based cloud IDE.
You can use natural language prompts to generate API specifications, transformations, and code.
Applications of MuleSoft
Let’s break down the applications of MuleSoft in the following.
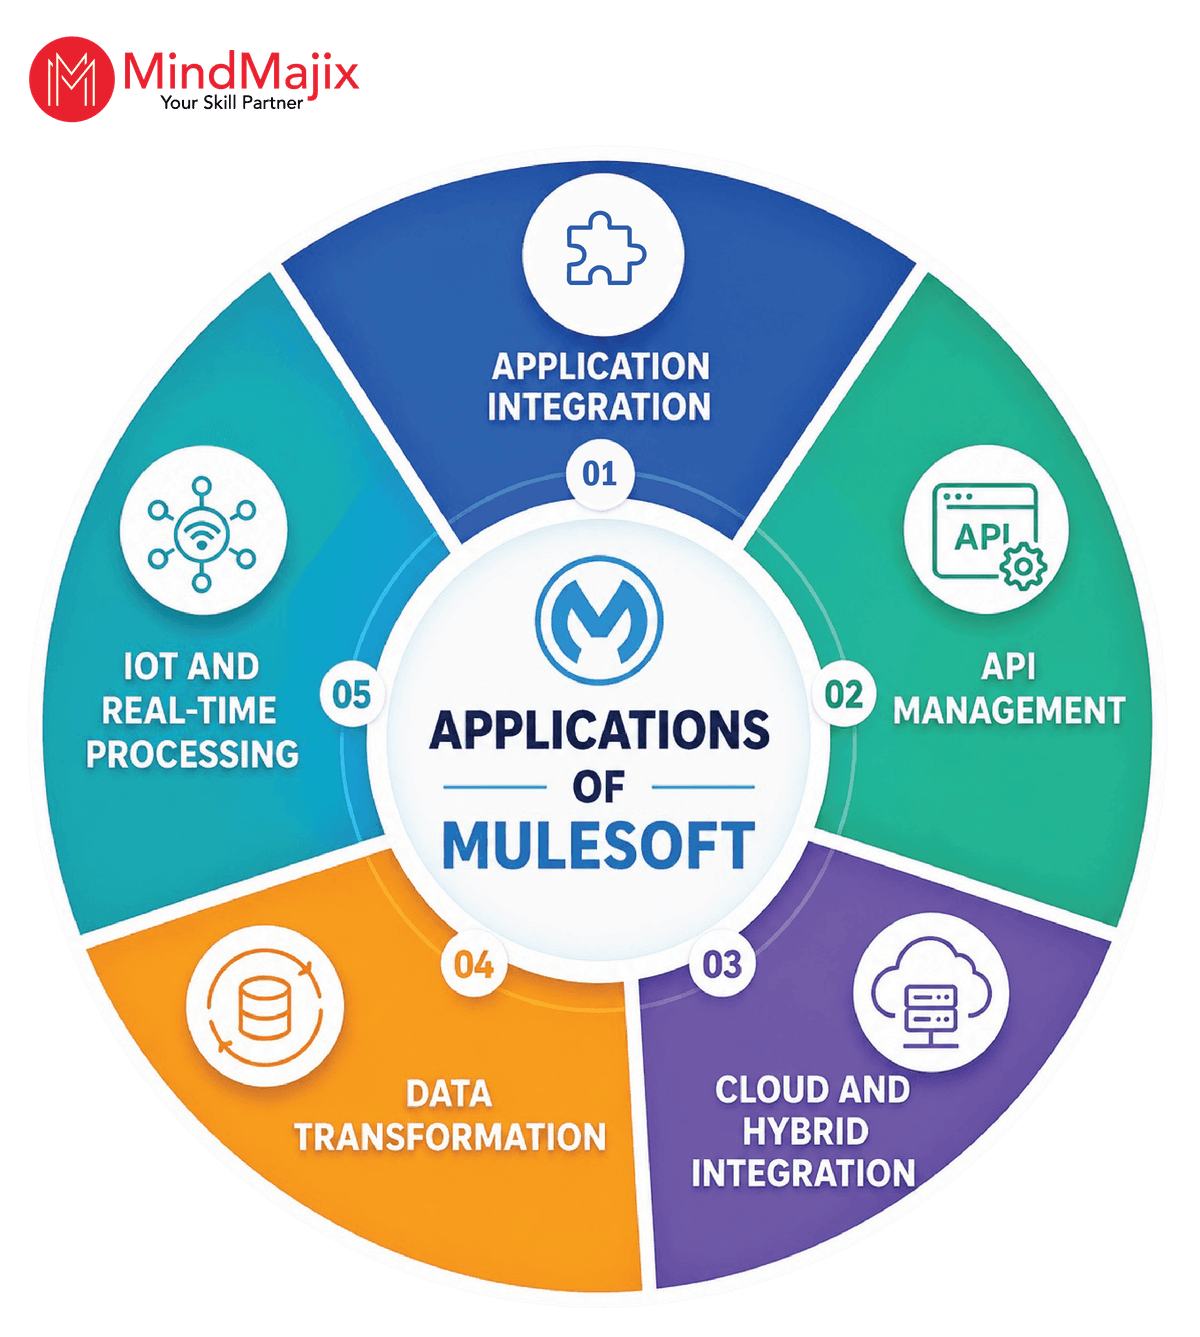
- Application integration – It connects disparate enterprise applications and enables seamless data exchange.
- API management – It helps organizations design, publish, secure, and monitor APIs using API-led architecture.
- Cloud and hybrid integration – It integrates cloud, on-premises, and hybrid environments.
- Data transformation – It transforms and migrates data between different formats and systems.
- IoT and real-time processing – It supports IoT integrations for processing real-time data streams.
Conclusion
Mule ESB is a lightweight Enterprise Service Bus that enables communication between applications on a single platform. The tutorial covered both basic and advanced concepts, making it a guide for beginners and advanced learners alike.
If you want to enhance your knowledge of MuleSoft further, you can enroll in a MuleSoft Course by MindMajix. By the end of the training, you will gain the skills needed to tackle complex challenges in real-time application integration.
Frequently Asked Questions
1. How difficult is it to learn MuleSoft for beginners?
Yes, you can learn MuleSoft easily. If you have a basic understanding of application and API integration concepts, then you can learn MuleSoft seamlessly.
2. How long will it take to learn MuleSoft?
You can learn MuleSoft in 3–4 weeks. You can become a skilled MuleSoft professional by consistently practicing labs and projects.
3. Is it worth learning MuleSoft?
MuleSoft developers with 2–5 years of experience in India can earn between 7.4 LPA and 8.2 LPA according to AmbitionBox. In the USA, MuleSoft engineers can earn between USD 76k and USD 181k, according to ZipRecruiter.
4. What is the difference between MuleSoft and Salesforce?
Salesforce is a CRM platform that focuses on managing customer, sales, and marketing processes, as well as analytics. On the other hand, MuleSoft is an iPaaS platform that connects applications, data, and APIs across cloud and on-premises systems.
 On-Job Support Service
Online Work Support for your on-job roles.

Our work-support plans provide precise options as per your project tasks. Whether you are a newbie or an experienced professional seeking assistance in completing project tasks, we are here with the following plans to meet your custom needs:
- Pay Per Hour
- Pay Per Week
- Monthly
| Name | Dates | |
|---|---|---|
| MuleSoft Training | Jun 27 to Jul 12 | View Details |
| MuleSoft Training | Jun 30 to Jul 15 | View Details |
| MuleSoft Training | Jul 04 to Jul 19 | View Details |
| MuleSoft Training | Jul 07 to Jul 22 | View Details |

Satish is a Data Management and Governance Practitioner with over 16 years of IT experience supporting enterprises to develop and optimize solutions that result in high value. He has an experience spanning across Data Warehouse ETL leveraging Informatica PowerCenter & Custom Tools, Databases like Teradata, Oracle, MS-SQL & Greenplum, Integrations design with MuleSoft, and Implemetation of Data Catalog, Governance and lineage applications such as Alation, Collibra & Manta at an Enterprise level. Satish was associated with GE, Dell & E2Open with successful implementation of Supply Chain integration solutions for several AMER & APJ region organisations. Currently, he is a Tech Lead at Dell within Information Governance space who plays a key role in setting up governance practice from grass-roots that traverse maturity through stewardship with a Business rules framework for data quality, metadata, and governance access capabilities. Satish is also actively involved in mentoring students at various levels from high school and Engineering as part of CSR by associating with various organizations such as FFE, to impart knowledge that would help gain insights on skills essential to be successful in their professional journey.


